

Story Board Banners
Banners provide a consistent "header" to the entire dashboard delivered through the Story Board application. Banners implicitly provide a convenient mechanism for slide/tab navigation and can also include corporate branding (logo and color formatting) options to deliver slick business analytic applications to end users.
Setting up Banners
To make a quick style change to the banner navigation, users can use the bottom part of the "Banner Design" button in the home tab. From here, users can make a quick selection using one of the several tab visualization options.
For the more advanced, customized banner design options, users should click the top of the banner design button on the home tab. This will take the user into the Banner Editor.
Banner Editor
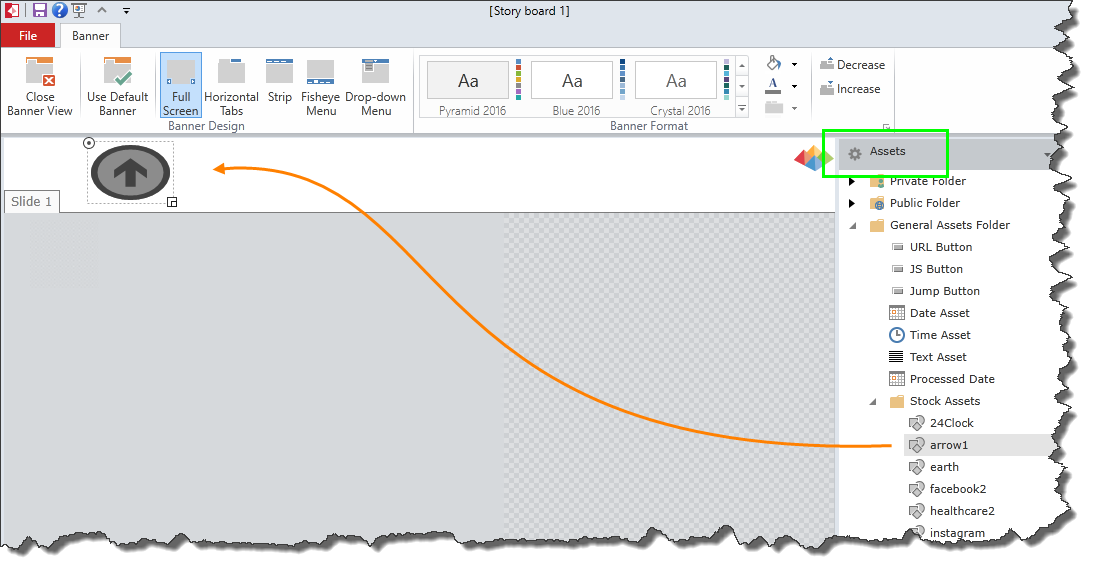
On opening the banner editor, you'll be able to access the banner ribbon tab. From here, the banner visual styles and formatting can be can set and edited.

Basic Designer Workflow
- Click on the Banner Designer button.
- Choose the appropriate banner visual style.
- Choose the theme and/or colors for the banner.
- Toggle with the banner height options to achieve the desired banner look.
- Click on the drop-down arrows to access specific folders and assets. Once you have selected the desired asset, you can drag it into the banner.
- To exit the Banner Designer Interface, click “Close Banner View”. You will return to the main Dashboard Interface.
If users elect to user grouped slides in a dashboard with sections, the ability to add and customize a separate banner control is made available using the bottom of each of the visual style buttons. This is where a user can pick the sub-navigation style for the banner.
Assets in Banners
On the right-hand side, there is an Assets tree to allow you to insert imported assets into the banner. Here, users simply drag and drop assets into the banner space. These can then be configured like all other assets.
NOTE: You cannot add dynamic assets to the banner.
Slide Sections
Since slide sections or groupings impact the way the banner navigation both looks and operates, its important to understand how to add and configure them.
Adding Sections
In the main story board editor, click on the slide tree. To add a section, right-click on a slide and select the “Add Section” option.
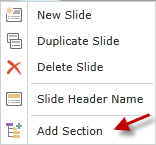
The new section will appear above the slide title as an “Untitled Section” button.
NOTE: All the slides below the section will be automatically included in that section until you add another section.
A small drop-down arrow will appear next to the section name to allow you to easily expand and collapse the section’s slides (outlined in red in image below).
Managing the Sections
A context menu will appear when you right-click on the section name.
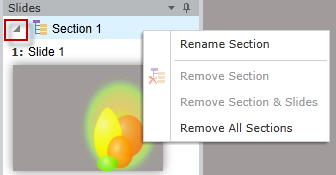
The section management options are as follows:
- You can rename the section as well as remove it alone or with all its slides.
- You can choose to remove all the sections in the dashboard at once.
Banner Tab Visualization Options
Once the banner options are available, users can select which type of grouping visualization they would like to use in the dashboard. The options are split into the “outer” grouping style, followed by the “inner” or sub grouping style. The options are as follows:
- Full Screen (designed to have no hierarchical grouping capabilities)
- Horizontal Tabs
- Horizontal tabs
- Strip Menu
- Fish-Eye menu
- Drop-Down menu
- Strip Menu
- Horizontal tabs
- Strip Menu
- Fish-Eye menu
- Drop-Down menu
- Drop Down Menu
- Horizontal tabs
- Strip Menu
- Fish-Eye menu
- Drop-Down menu
Examples of these visualization options can be seen here.
Home |
Table of Contents |
Index |
User Community
Pyramid Analytics © 2011-2022